
How to Run Security Camera Cable Through Walls and Attics
Running the cable is the part of a security camera install that scares most people off — and it’s exactly where a clean, professional job separates a system that lasts a decade from a mess of cable staples and exposed wire flapping in the wind. The good news: with the right approach, fishing Ethernet through walls and across an attic is well within reach of a determined homeowner. The same principles plumbers and electricians use to get a line from point A to point B apply here.
This guide walks through the real-world process: planning your runs, the tools that actually matter, how to get cable down an exterior wall, and how to cross an attic without creating a fire-code or moisture problem. If you haven’t picked your cable yet, start with our guide on outdoor-rated Ethernet cable so you’re pulling the right wire before you open up a wall.
Plan the Run Before You Cut a Single Hole
The biggest mistake we see is people drilling first and thinking second. Spend twenty minutes planning and you’ll save yourself hours.
Map Camera Locations to Your NVR or PoE Switch
Every camera cable has to get back to your NVR or PoE switch. Stand at each planned camera location and trace the most direct path back to where your recorder lives — usually a closet, basement, or utility room. The shortest run isn’t always the easiest; a slightly longer path through an unfinished attic or basement beats fishing through a finished, insulated wall every time.
Know Your Distance Limit
PoE over standard Cat5e or Cat6 has a hard limit of 328 feet (100 meters) for the combined data-and-power run. Most homes never come close, but barns, detached garages, and long ranch-style runs can. If you’re pushing distance, read our guide on how far you can run a PoE camera before you commit to a path.
Locate Studs, Plates, and Obstructions
Use a stud finder to map the wall cavity. The two things that stop a cable pull cold are the top plate (the horizontal framing at the top of the wall where it meets the ceiling) and fire blocking (horizontal blocks mid-wall in some construction). Knowing where these are before you fish saves enormous frustration.
Tools You Actually Need
You don’t need a contractor’s van, but a few specific tools make this job dramatically easier:
Glow Rods (Fish Sticks)
A set of fiberglass glow rods is the single most useful tool for this work. They push through insulation, span attic gaps, and let you guide cable across spaces you can’t reach. Spend the money here — flimsy rods are useless.
Fish Tape or a Pull String
For vertical wall drops, a steel or nylon fish tape feeds down through the top plate and lets you pull cable up or down a wall cavity. A weighted pull string (a chain or a fishing weight tied to mason’s line) works for straight vertical drops in open cavities.
A Right-Angle Drill and a Long Auger or Spade Bit
To drill down through a top plate from the attic, you need a long bit — typically a 12-inch or 18-inch installer’s bit — and ideally a right-angle drill to fit in tight attic spaces. A standard drill with a long bit works in a pinch but is awkward in a low attic.
Safety Gear
Attics mean insulation, heat, and the risk of stepping through a ceiling. Wear a respirator or N95, eye protection, gloves, and knee pads. Only step on joists or lay down planks — never on the drywall between them. In summer, work in the early morning before the attic becomes an oven.
Running Cable Down an Exterior Wall
This is the most common scenario: a camera mounted under a soffit or on an exterior wall, with the cable dropping down inside the wall to a basement or running up into the attic.
Drilling Down From the Attic
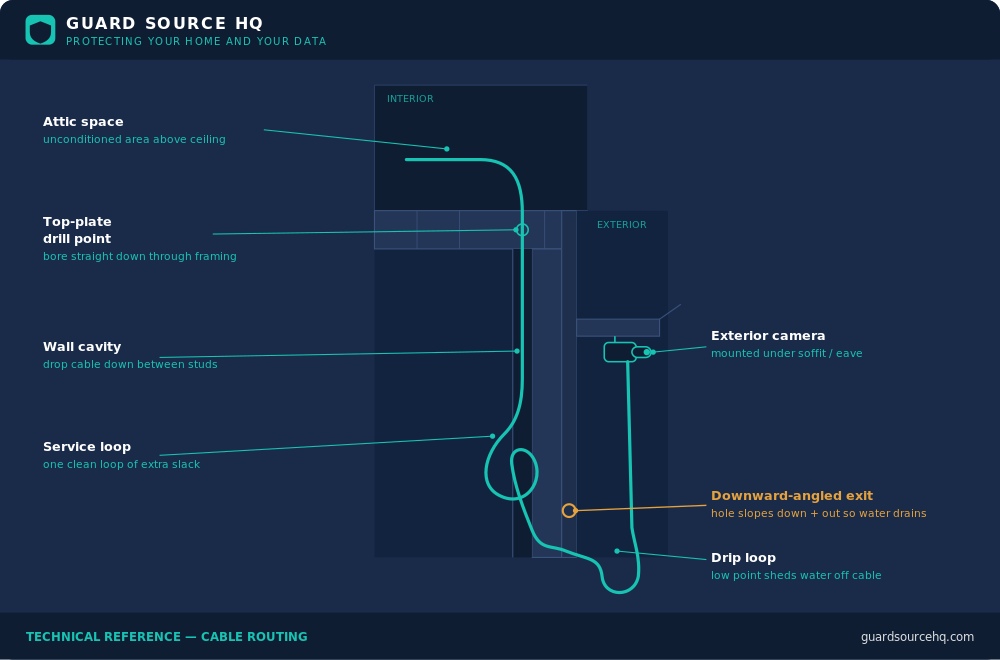
If your camera location sits below an accessible attic, this is the cleanest method. From inside the attic, find the top plate directly above the wall cavity where you want the cable to drop. Drill straight down through the top plate with your long bit, staying centered in the wall so you don’t hit the drywall on either side. Feed your fish tape or a weighted string down the cavity to your exit point.
Drilling Through the Exterior Wall to the Camera
At the camera location, drill a small pilot hole angled slightly downward toward the outside. The downward angle is critical — it keeps rainwater from running back along the cable into the wall. Pass your cable through, leave a generous service loop, and seal the penetration thoroughly. We cover sealing in depth in our guide on weatherproof junction boxes and connectors, but at minimum use exterior-grade silicone or a proper cable gland.
Creating a Drip Loop
Always leave a downward loop of cable just before it enters the wall. Water runs downhill; a drip loop forces any moisture on the cable to drip off at the low point instead of following the wire into your wall. This is a habit every tradesman has and most DIYers skip — don’t skip it.
Crossing the Attic
Once your cable is up in the attic, you need to get it across to where it drops down to the NVR. A few rules keep this safe and code-compliant.
Keep Cable Off the Insulation Where Possible
Running low-voltage cable directly buried under deep insulation isn’t dangerous, but it makes future service miserable and the cable harder to trace. Where practical, run along the side of joists or use cable guides.
Secure, but Don’t Crush
Use insulated staples or cable clips made for low-voltage wire, and never drive a staple tight enough to deform the cable jacket. Crushing the cable degrades performance and can break the delicate twisted pairs inside. Staple every 4 to 5 feet on runs, and within 12 inches of any termination.
Stay Clear of Heat Sources and Recessed Lights
Keep cable at least a few inches away from recessed can lights (unless they’re IC-rated), flue pipes, and chimneys. Heat degrades cable insulation over time.
Mind the Electrical
Run your data cable parallel to electrical wiring, not crossing it at length. Where you must cross AC power, cross at a 90-degree angle to minimize interference. Keeping a few inches of separation from Romex prevents electrical noise from creeping into your video feed.
Fishing Through a Finished Wall (No Attic Access)
Two-story homes and walls with no attic above are the hard case. Here you’re fishing blind inside a closed cavity.
Cut a small access hole at the top and bottom of your intended run (an old-work box location works well). Drop a weighted string from the top opening and retrieve it at the bottom. If fire blocking stops your string partway down, you’ll need to cut an access point at that level, drill through the block, and continue the pull — then patch the access holes afterward. This is tedious but doable. If a wall turns into a real fight, reroute through an adjacent closet or run surface conduit instead; there’s no shame in choosing the path of least resistance.
Common Cable-Pulling Mistakes to Avoid
A few things turn a clean install into a callback:
- Pulling too hard. Yanking cable around a corner stretches and damages the internal pairs. If it won’t move, find out why instead of forcing it.
- Kinking the cable. A sharp kink permanently deforms the conductors. Maintain a gentle bend radius — at least four times the cable diameter.
- No service loop. Always leave extra cable at both ends. A few feet of slack at the camera and at the NVR saves you when you need to re-terminate or reposition.
- Forgetting to label. Label both ends of every run as you pull it. Tracing unlabeled cable later is miserable.
- Drilling through a wire or pipe. In an unfamiliar wall, drill slowly and stay aware of where plumbing and electrical runs are likely to be.
When to Use Conduit Instead
For exterior runs along a wall, across a soffit, or out to a detached structure, surface conduit protects the cable from UV, weather, and physical damage far better than bare cable. If part of your run is exposed to the elements, read our guide on conduit for exterior camera runs — it’s the difference between a five-year install and a fifteen-year one.
The Bottom Line
Running camera cable through walls and attics is mostly about planning, patience, and respecting a few basic rules: angle your penetrations downward, leave drip loops and service loops, don’t crush the cable, and keep clear of heat and electrical. Take your time on the first run and the rest go faster. A clean cable job you can’t even see is the mark of an install done right — and it’s what keeps your cameras working long after the cheap installs have failed.
Once your cable is run, the next step is getting your cameras solidly mounted. See our guide on camera mounting hardware and brackets to finish the job properly.
Frequently asked questions
What’s the 328-foot cable limit about?
It’s the maximum length of a single PoE-over-copper run. Past about 100 meters, power and data degrade — you’ll need a PoE extender, a midspan switch, or fiber for longer distances.
What’s a service loop and why leave one?
A few feet of extra cable coiled at the camera and the NVR. It lets you re-terminate or reposition later without pulling new wire — a habit every tradesman keeps.
Do I need outdoor-rated Ethernet cable for the run?
Yes for any exterior portion. Indoor cable degrades in UV and moisture within a couple of years; outdoor-rated (and direct-burial where buried) cable is built to survive it.
How do I keep electrical noise out of my video?
Run data cable parallel to and a few inches away from electrical wiring, and where you must cross AC power, cross at a 90-degree angle.
Do I need professional installation to run cable?
Many homeowners can pull cable with patience and the right tools. Call a pro for high or complex runs, electrical work, or when you’re not comfortable on a ladder or in an attic.
Who runs Guard Source HQ
Guard Source HQ grew out of problems I’ve spent years solving for myself, friends, and family. I’ve moved five times, set up all kinds of security camera systems, and helped friends and family install and troubleshoot theirs. I’ve had my own router compromised through a smart device, and people now come to me or get sent my way when something online doesn’t look right or after they’ve been scammed. I built Guard Source HQ to turn what I’ve learned from solving those problems into guides and tools regular people can use.
Need help with something I haven’t covered? Ask a question or suggest a topic.
Related: Pulling 12V power wire on that run? Confirm the gauge holds voltage over the distance with our 12V camera voltage-drop guide.