Cable Management for Security Camera Runs: Raceways, Clips, Conduit, and More
The difference between an install that looks professional and one that looks like a weekend hack job usually comes down to cable management. Bare wire stapled in loose loops, drooping spans between the camera and the wall, cable flapping in the wind — it not only looks bad, it shortens the life of the run. UV breaks down jacket, wind fatigues the wire, and an exposed cable is the first thing a burglar reaches for. This guide walks through every realistic way to dress and protect your camera cable, indoors and out, so you can pick the right method for each section of your run.
This pairs closely with our guides on running camera cable through walls and attics and conduit for exterior camera runs. Think of cable management as the menu, and conduit as one important item on it that gets its own deep dive.
Match the Method to the Location
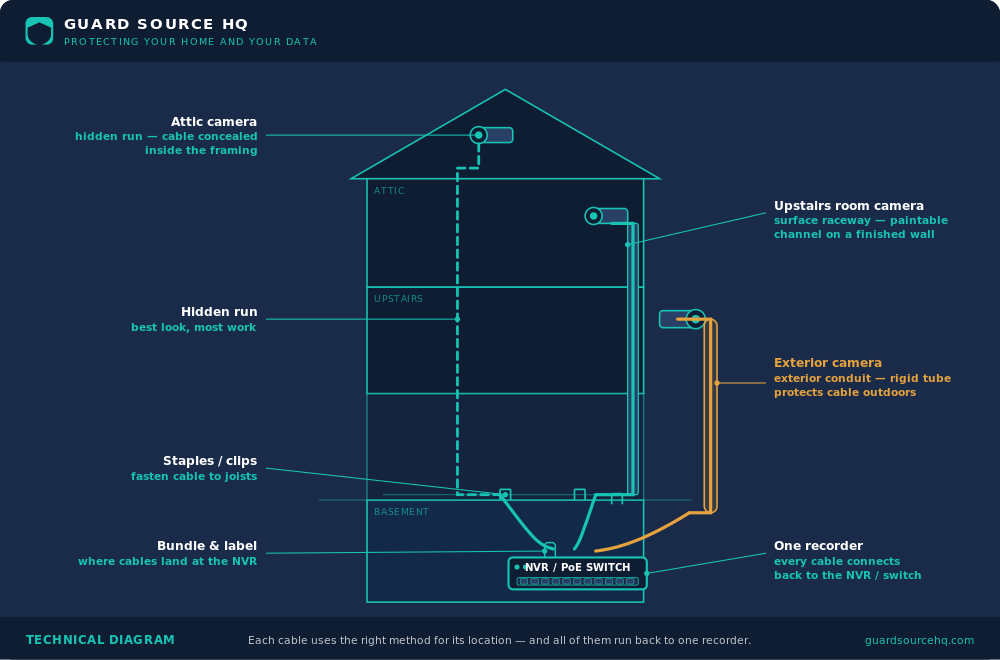
There’s no single right answer — a good install uses different methods for different sections. The cable inside your attic doesn’t need the same protection as the six feet running exposed along an exterior brick wall. Plan each segment of the run separately:
- Hidden runs (inside walls, attics, basements) need securing, not protecting from weather.
- Exposed indoor runs (along a basement ceiling, down a garage wall) benefit from tidy raceway or clips.
- Exposed outdoor runs need UV and physical protection — usually conduit.
Cable Clips and Staples
The simplest method, and perfectly good for hidden or low-exposure runs.
Insulated Cable Staples
Plastic-insulated staples (the rounded kind made for low-voltage and coax, not the sharp metal kind for Romex) secure cable to wood framing in attics, basements, and along fascia. The cardinal rule: never drive a staple tight enough to deform the cable jacket. Crushing the cable damages the twisted pairs inside and degrades your signal. Snug, not crushed. Space them every 4 to 5 feet on a run, and within a foot of any termination or corner.
Screw-In Cable Clips and Saddles
For a cleaner result than staples, J-hooks and screw-mounted saddle clips hold cable without any crushing risk and make future service easier — you just unclip instead of prying staples. These are the preferred choice along finished surfaces and anywhere you might need to pull the cable later.
Surface Raceway (Wire Channel)
When you can’t get a cable inside a wall and you don’t want bare wire showing, surface raceway is the answer. It’s a paintable plastic channel with an adhesive or screw-mounted base and a snap-on cover. You lay the cable in the base, snap the cover shut, and you get a clean, finished line you can paint to match the wall.
Where Raceway Shines
Raceway is ideal for finished indoor spaces — running down a wall from a ceiling-mounted indoor camera, across a garage, or anywhere fishing inside the wall isn’t practical. It hides the cable, protects it from snags, and looks intentional.
Sizing and Corners
Buy raceway sized with room to spare — a channel crammed full is hard to close and impossible to add to later. Manufacturers sell matching inside corners, outside corners, and T-fittings so you can turn cleanly instead of kinking the cable around a bend. Use them; mitered corners look sharp and protect the bend radius.
Conduit (The Short Version)
Conduit — rigid or flexible tubing that fully encloses the cable — is the heavy-duty option, and it’s essential for exposed exterior runs. Because exterior conduit has enough nuance to warrant its own guide, we cover types, weather-rating, burial, and detached-building runs in depth in our conduit for exterior camera runs article. The short version for cable-management planning: any cable exposed to sun, weather, or physical damage should be in conduit, not bare and not just in raceway. Raceway is for indoors; conduit is for outdoors and anywhere the cable could take a hit.
Velcro, Ties, and Bundling at the NVR
Where all your cables converge at the NVR or PoE switch, management matters for a different reason: serviceability. A rat’s nest behind the recorder makes every future change miserable.
Use Hook-and-Loop, Not Zip Ties
Reusable hook-and-loop (Velcro) straps are far better than nylon zip ties for bundling network cable. Over-tightened zip ties crush the cable and have to be cut every time you add a line. Velcro lets you bundle neatly and adjust freely.
Label Everything
Label both ends of every cable at the NVR. When a camera goes down and you need to find its specific cable among twelve identical ones, labels turn a thirty-minute hunt into a ten-second job. If you’re troubleshooting a camera that won’t come up, our guides on cameras that keep going offline and camera has power but no video assume you can identify the right run quickly — labels make that possible.
Bend Radius: The Rule That Protects Every Method
No matter how you dress the cable, respect its bend radius. Ethernet should never bend tighter than about four times its own diameter — roughly a one-inch minimum radius for typical Cat5e/Cat6. A sharp 90-degree kink permanently deforms the internal conductors and can drop you from gigabit to a crawl, or knock a marginal PoE run offline entirely. Gentle sweeping curves at every corner, always.
Service Loops: Leave Yourself Slack
At both ends of every run, coil up a few feet of extra cable as a service loop. At the camera, it lets you reposition or re-terminate without re-pulling the whole run. At the NVR, it lets you move the recorder or re-route. Tuck the loop neatly into the junction box, the wall cavity, or a coil secured to the framing. It’s the kind of foresight that costs nothing now and saves you an entire re-pull later.
Common Cable Management Mistakes
- Crushing cable with tight staples or zip ties. Snug, never deformed. Use insulated staples and Velcro.
- Bare cable exposed outdoors. UV and weather destroy unprotected jacket. Use conduit outside.
- Sharp bends at corners. Respect bend radius — gentle curves only.
- No service loops. Always leave slack at both ends.
- Undersized raceway. Buy a channel with room to spare so you can close it and add to it later.
- No labels at the NVR. Unlabeled cable turns every future fix into a guessing game.
The Bottom Line
Good cable management is a mix of methods matched to location: staples and clips for hidden runs, raceway for tidy indoor spans, conduit for anything exposed to weather, and Velcro plus labels at the NVR. Respect bend radius everywhere and leave service loops at both ends. Done right, the cable practically disappears — and that clean, protected run is what keeps the system working long after a sloppy install has started failing.
For exposed exterior runs, the next step is doing conduit right — see our full guide on conduit for exterior camera runs.
Frequently asked questions
Can I use regular staples on network cable?
Use plastic-insulated staples made for low-voltage cable, not the sharp metal kind for Romex, and never drive them tight enough to deform the jacket. Screw-in clips and saddles are even safer.
What’s the difference between raceway and conduit?
Raceway is a paintable indoor wire channel for tidy exposed runs; conduit is enclosed tubing that protects cable from UV, weather, and impact outdoors. Raceway is for indoors, conduit for outdoors.
Why use Velcro instead of zip ties at the NVR?
Over-tightened zip ties crush network cable and have to be cut every time you add a line. Reusable hook-and-loop straps bundle neatly and adjust freely.
How tight can I bend Ethernet cable?
No tighter than about four times its own diameter — roughly a one-inch minimum radius for Cat5e/Cat6. A sharp kink can drop the run’s speed or knock a marginal PoE camera offline.
Where should I leave service loops?
At both ends of every run — a few feet of coiled slack at the camera and at the NVR — so you can reposition, re-terminate, or move the recorder without re-pulling cable.
Who runs Guard Source HQ
Guard Source HQ grew out of problems I’ve spent years solving for myself, friends, and family. I’ve moved five times, set up all kinds of security camera systems, and helped friends and family install and troubleshoot theirs. I’ve had my own router compromised through a smart device, and people now come to me or get sent my way when something online doesn’t look right or after they’ve been scammed. I built Guard Source HQ to turn what I’ve learned from solving those problems into guides and tools regular people can use.
Need help with something I haven’t covered? Ask a question or suggest a topic.