
Security Camera Placement Guide: Angles, Height, and Coverage
You can buy the sharpest cameras on the market and ruin the whole system with bad placement. A camera aimed too steeply sees nothing but the top of people’s heads. One mounted facing the setting sun washes out every afternoon. One placed where a porch light backlights everyone turns faces into silhouettes. Placement is where a security system actually earns its keep, and it’s free — it costs nothing but thought. This guide covers where to put cameras, how high to mount them, what angles to use, and how to build coverage that leaves no blind spots where it counts.
This pairs with our guides on how high to mount security cameras and camera mounting hardware and brackets. Plan placement first, then mount.
Start by Identifying What You’re Protecting
Before you pick a single mounting spot, walk your property and list what actually matters. Effective placement is about priorities, not blanket coverage. The high-value targets for almost every home are:
- Entry points — front door, back door, side doors, and any ground-floor windows an intruder could use.
- Driveway and vehicles — where packages arrive and cars get broken into.
- The approach — the path someone takes to reach the house, so you catch them coming, not just at the door.
- Blind sides — the dark side yard or back corner nobody can see from the street.
Cover those first. A camera on every eave is wasted if the side gate nobody watches has no coverage at all.
Mounting Height: The Sweet Spot
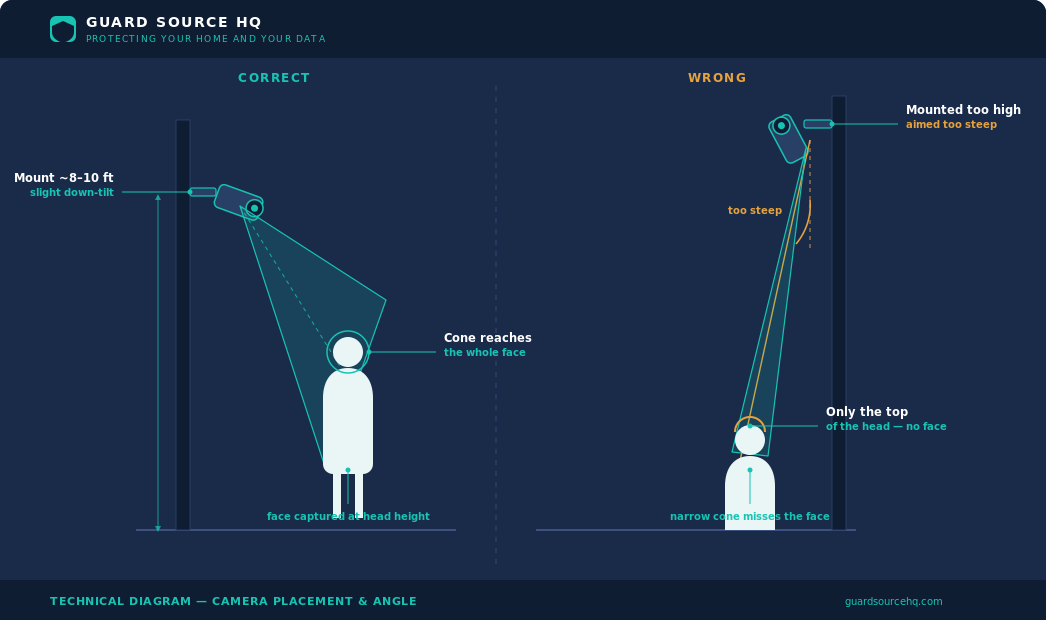
Height is the most common placement mistake, in both directions. Too low and the camera is reachable — vandalized, stolen, or knocked askew. Too high and you get a great view of the tops of heads but no usable faces.
The practical sweet spot for most exterior cameras is roughly 8 to 10 feet — high enough to be out of easy reach, low enough to still capture identifiable faces rather than just scalps. We go deeper on the reasoning and exceptions in our dedicated guide on how high to mount security cameras, but 8 to 10 feet is the number to start from for most residential mounting.
The Angle Problem: Don’t Point Straight Down
A camera’s job is usually to identify a person, which means you need a view of their face, not the crown of their head. Mount too high and aim too steeply down and you get exactly the wrong thing.
Aim for a downward tilt that still captures faces at the distance you care about — typically a shallow angle that frames a person from roughly the chest up as they approach. At a front door, position the camera off to the side and slightly above the door so it catches the face of someone standing at it, not the back of their head as they face the door. A camera mounted directly above a door, pointing straight down, is one of the most common and least useful placements there is.
Light: The Make-or-Break Factor
More cameras are ruined by light than by any other single factor. Two problems dominate.
Backlighting and Sun Glare
Never aim a camera directly at the sun’s path or at a bright light source. A camera facing east gets blinded every sunrise; one facing west washes out every evening. A bright porch light or streetlight behind your subject turns them into a black silhouette. Aim cameras so the sun and major light sources are behind the camera, lighting the scene, not in front of it. Where you can’t avoid it, look for cameras with strong WDR (wide dynamic range) to balance the exposure.
Night Vision and IR Reflection
At night, infrared illuminators do the lighting, and they create their own problems. Aim a camera too close to a wall, a soffit, or a window and the IR bounces straight back, washing out the image. Glass is the worst offender — a camera shooting through or near a window at night often sees nothing but its own IR glare. If you’re fighting nighttime washout, our guide on night vision and IR glare walks through the fixes. The placement rule: keep cameras away from nearby reflective surfaces and never shoot through glass at night.
Building Coverage Without Blind Spots
Overlap Your Fields of View
Position adjacent cameras so their coverage overlaps slightly. Overlap means a person crossing your property is never invisible in the handoff between cameras, and it gives you two angles on key areas. It also means one failed or blocked camera doesn’t open a total gap.
Cover the Cameras Themselves
A smart intruder looks for and disables cameras. Position at least one camera so it covers the approach to your other cameras and the NVR location — if someone reaches up to cover or cut a camera, another one catches them doing it. This single trick defeats a huge share of attempts to blind a system.
Match Camera Type to the Job
Use a wider field-of-view camera to cover a broad area like a backyard, and a narrower, longer-range camera where you need detail at distance, like reading a license plate at the end of a driveway. One camera can’t do both well — a lens wide enough to cover the whole yard won’t give you a readable plate at sixty feet.
Respect Privacy Lines
Aim cameras at your own property. Pointing a camera into a neighbor’s windows or capturing the interior of their home invites complaints and, in some places, legal trouble. Most cameras offer privacy masking — zones you can black out in the image — to keep a neighbor’s window or a public sidewalk out of frame while still covering your own approach. Use it. Good coverage of your property doesn’t require surveilling anyone else’s.
Indoor Placement
Inside, prioritize the main entry paths and central areas an intruder must pass through — a downstairs hallway or the main living area often covers more than a camera in every room. Mount in a high corner for the widest view, keep cameras out of bathrooms and bedrooms for privacy, and watch for the same backlighting problem from bright windows during the day.
Common Placement Mistakes
- Mounting too high and aiming too steep. You get scalps, not faces. Keep the angle shallow enough to capture faces.
- Facing into the sun or a light source. Light the scene from behind the camera, not in front of it.
- Shooting through glass at night. IR reflects off glass and ruins the image. Mount outside or kill the IR.
- No overlap between cameras. Gaps in coverage are where intruders walk. Overlap fields of view.
- Not covering the cameras themselves. Have one camera watch the others’ approach.
- Capturing a neighbor’s property. Aim at your own property and use privacy masking.
The Bottom Line
Placement is the cheapest, highest-impact decision in your whole system. Cover your real priorities first, mount around 8 to 10 feet with a shallow downward angle that captures faces, keep the sun and lights behind the camera, avoid shooting through glass at night, overlap your coverage, and have your cameras watch each other. Get placement right and modest cameras outperform expensive ones that are pointed wrong. It costs nothing but a careful walk around your property before you drill.
Ready to lock in your mounting heights? See our dedicated guide on how high to mount security cameras.
Frequently Asked Questions
How high should I mount a security camera?
For most exterior cameras, 8 to 10 feet is the sweet spot — high enough to be out of easy reach and hard to tamper with, low enough to capture identifiable faces instead of just the tops of heads.
What angle should a security camera point at?
Use a shallow downward tilt that frames a person from roughly the chest up as they approach, not a steep straight-down angle. At a door, mount the camera off to the side and slightly above so it catches the face rather than the back of the head.
Why does my camera get washed out during the day?
It’s usually facing into the sun or a bright light source. Re-aim the camera so the sun and major lights are behind it, lighting the scene, and choose a camera with strong wide dynamic range (WDR) for spots you can’t avoid, like a west-facing driveway at sunset.
Can one camera cover my whole yard?
Rarely well. A lens wide enough to see the whole yard shrinks detail, so you won’t get a readable face or plate at distance. Two cameras at good angles — one wide, one narrower for detail — capture far more usable footage than one trying to see everything.
How do I stop an intruder from disabling my cameras?
Overlap your coverage and position at least one camera to watch the approach to the others and the NVR. If someone reaches up to cover or cut a camera, another one records them doing it — which defeats most attempts to blind a system.
Who runs Guard Source HQ
Guard Source HQ grew out of problems I’ve spent years solving for myself, friends, and family. I’ve moved five times, set up all kinds of security camera systems, and helped friends and family install and troubleshoot theirs. I’ve had my own router compromised through a smart device, and people now come to me or get sent my way when something online doesn’t look right or after they’ve been scammed. I built Guard Source HQ to turn what I’ve learned from solving those problems into guides and tools regular people can use.
Need help with something I haven’t covered? Ask a question or suggest a topic.