
Weatherproof Junction Boxes and Connectors for Outdoor Cameras
The number one killer of outdoor security cameras isn’t a failed sensor or a bad NVR — it’s water getting into a connection. A camera can be rated IP67 and still go dark in the first hard rain if the RJ45 connector behind it was left exposed. The camera body is sealed at the factory; the connection you make in the field is not, and that’s the weak point. This guide covers how to seal your outdoor connections properly using junction boxes, waterproof connectors, and the right sealing technique — the way it’s done to actually last.
If you’re still planning your install, this pairs directly with our guides on camera mounting hardware and brackets and weatherproofing and sealing outdoor camera installs.
Why Connections Fail in Weather
Two things destroy an outdoor connection: direct water intrusion and condensation. Direct water is obvious — rain runs along a cable and pools at a connector. Condensation is sneakier. Daily temperature swings cause humid air inside an unsealed enclosure to condense into water droplets, which corrode the gold contacts on an RJ45 plug over weeks and months. You don’t see it happen; you just notice the camera dropping offline intermittently, then permanently. If you’re chasing a camera that keeps disconnecting, our guide on cameras that keep going offline covers the full diagnostic path, but corroded connections are a leading cause.
The Junction Box: Your First Line of Defense
A weatherproof junction box gives your connection a sealed, dry home. For most residential PoE installs, this is the single most important weatherproofing component.
What to Look For
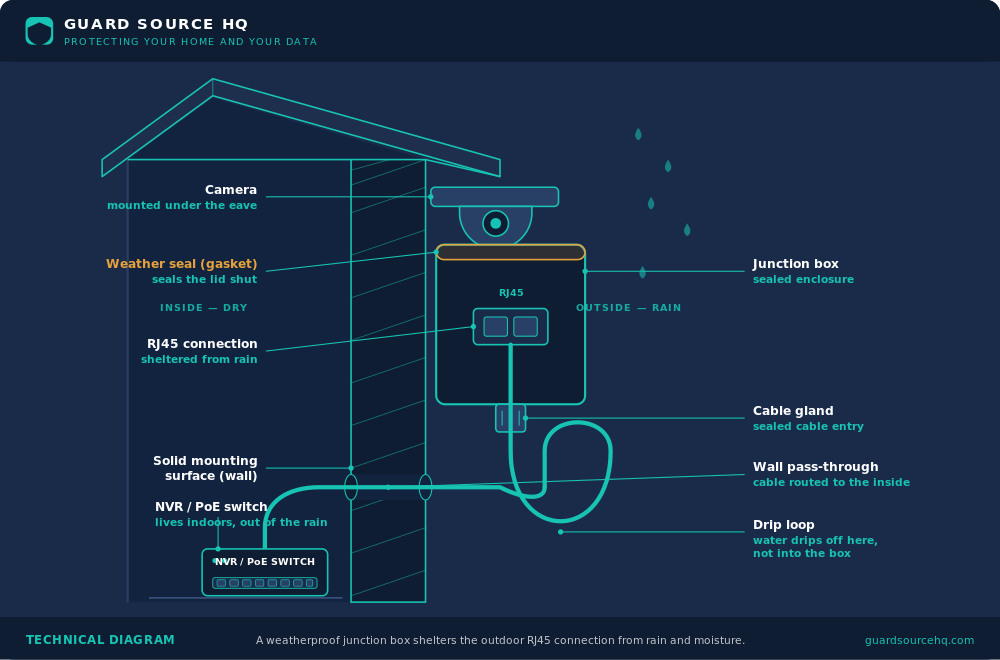
Look for a box rated IP66 or higher, with gasketed lid seals and proper cable-entry points. Brand-matched boxes that screw directly to your camera base are the cleanest option because the cable connection lives entirely inside the box, never exposed. Universal boxes work too — just confirm the cable pass-throughs line up and come with grommets or glands.
Mounting the Box Sealed
When you mount the box to a wall or soffit, run a bead of exterior silicone around the back edge (leaving a small gap at the bottom so any incidental moisture can drain rather than collect). On contoured surfaces like lap siding, use a mounting block so the box seats flat against a sealed surface.
Waterproofing the RJ45 Connection Itself
Even inside a junction box, the RJ45 connection deserves protection. Outside a box — say, at a mid-run coupler — it’s mandatory. You have a few good options.
Waterproof RJ45 Coupler Kits
Most PoE cameras ship with a cable pigtail ending in an RJ45 jack and a screw-together waterproof cap assembly. The cap threads over your field-terminated cable, the connection mates inside, and a rubber gasket and threaded collar seal it. These work well if you actually use every piece. The most common failure is people skipping the gasket ring or not threading the collar down fully. Use all the parts, hand-tighten firmly.
Self-Amalgamating (Self-Fusing) Tape
This is the professional’s secret weapon. Self-amalgamating silicone tape isn’t sticky — it bonds to itself under tension and forms a single solid waterproof rubber sleeve over the connection. Stretch it as you wrap, overlap each pass by half, and it fuses into a seamless seal in minutes. Unlike electrical tape, it won’t unravel, leave gunk, or let water track underneath. Wrap the entire connector and an inch of cable on each side. It’s the right choice on every exposed connection — cheap, foolproof, and removable when you need to service the line later.
What NOT to Use
Regular electrical tape is not a weatherproof seal. It loses adhesion in heat, traps moisture against the connection, and peels in a season or two. Silicone caulk smeared over a connector is also a bad idea — it makes future service a nightmare and doesn’t seal as reliably as it looks. Use the right product.
Cable Glands: Sealing the Entry Point
Wherever a cable enters an enclosure, a junction box, or a wall, a cable gland (also called a cord grip) provides a compression seal around the cable jacket. You feed the cable through, tighten the gland nut, and a rubber ferrule clamps down to seal out water while providing strain relief. For any penetration into an enclosure that didn’t come pre-gasketed, a gland is the clean answer.
The Drip Loop: Free Insurance
No matter what sealing method you use, always leave a drip loop — a downward dip in the cable just before it reaches the connection or enters a wall. Water travels along a cable by gravity and surface tension; a drip loop forces it to drip off at the bottom of the loop instead of running into your connector or your wall. It costs nothing and prevents a huge share of water-intrusion failures. Every tradesman does this automatically; make it a habit.
Step-by-Step: A Properly Sealed Connection
1. Position Inside or Behind a Junction Box
Plan for the connection to live inside a weatherproof junction box wherever possible.
2. Terminate Cleanly
Make sure your RJ45 termination is solid and tested before you seal it. Sealing a bad connection just locks in the problem. If you’re unsure the run is good, test it now.
3. Apply the Waterproof Cap or Self-Fusing Tape
Use the camera’s waterproof cap kit with every component, or wrap the mated connection in self-amalgamating tape, overlapping by half and extending past the connector on both sides.
4. Seal the Enclosure and Entry Points
Close the gasketed lid, seal cable entries with glands or grommets, and silicone the box to the wall (leaving a bottom drain gap).
5. Set Your Drip Loop
Dress the cable so there’s a clear downward loop before the connection or wall entry.
Common Weatherproofing Mistakes
- Relying on the camera’s IP rating alone. The camera is sealed; your field connection is not. Seal it separately.
- Using electrical tape. It is not weatherproof. Use self-fusing tape or a proper cap kit.
- Skipping parts of the waterproof cap kit. Every gasket and collar matters. Use them all.
- Sealing a box completely airtight with no drainage. Trapped condensation needs a low point to escape. Leave a small bottom drain gap.
- No drip loop. The cheapest, easiest protection there is — don’t skip it.
The Bottom Line
Outdoor cameras live or die at the connection. Put every field connection inside a weatherproof junction box, seal the RJ45 with a proper cap kit or self-amalgamating tape, use cable glands at entry points, and always leave a drip loop. Spend the extra ten minutes per camera and you’ll never chase a water-related dropout. Skip it, and you’ll be back up the ladder in the first storm.
For sealing wall penetrations and the camera body itself, see our full guide on weatherproofing and sealing outdoor camera installs.
Frequently asked questions
What IP rating should an outdoor junction box have?
Look for IP66 or higher with gasketed lid seals and proper cable-entry points. That level keeps out driving rain and dust.
Is electrical tape okay for sealing an RJ45 outdoors?
No. Electrical tape loses adhesion in heat, traps moisture against the connection, and peels within a season. Use a proper waterproof cap kit or self-amalgamating tape.
What is self-amalgamating tape?
A silicone tape that isn’t sticky — it bonds to itself under tension and fuses into a single solid waterproof rubber sleeve. Stretch it as you wrap, overlap each pass by half, and extend past the connector on both sides.
Why leave a drain gap in a “waterproof” box?
Daily temperature swings create condensation inside any enclosure. A small gap at the bottom lets that moisture drain instead of collecting and corroding the connection.
Why does my camera fog up or fill with condensation?
The seal or desiccant has failed. Dry it out, replace the gasket, and reseal the penetration — then confirm your drip loop and drain gap are in place.
Who runs Guard Source HQ
Guard Source HQ grew out of problems I’ve spent years solving for myself, friends, and family. I’ve moved five times, set up all kinds of security camera systems, and helped friends and family install and troubleshoot theirs. I’ve had my own router compromised through a smart device, and people now come to me or get sent my way when something online doesn’t look right or after they’ve been scammed. I built Guard Source HQ to turn what I’ve learned from solving those problems into guides and tools regular people can use.
Need help with something I haven’t covered? Ask a question or suggest a topic.